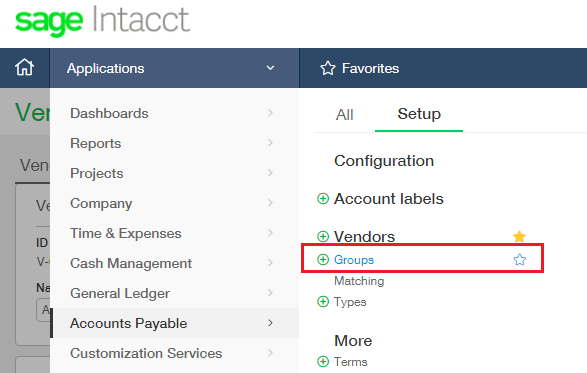
When setting up your AP Vendors you might have noticed the option to set up vendor groups. Vendor Groups are a useful way to group vendor records using filter criteria specific to your needs. Not only are Vendor Groups great for customizing your list screen but they can also be used to filter vendors for reports for Advanced Financial Reporting by Vendor. Some examples of commonly used vendor groups are Active Vendors, Inactive Vendors and Vendors with Balances. For a business that has a lot of different vendor types, it might be useful to make a group for each type: One for Contractors, one for Tradespeople, etc.

This will take you to the Vendor Groups list screen. If your implementation is new, or perhaps Vendor Groups aren’t being used, your list will most likely be empty. A new Vendor Group can be created by clicking the add button at the top right on the Vendor Groups list screen.

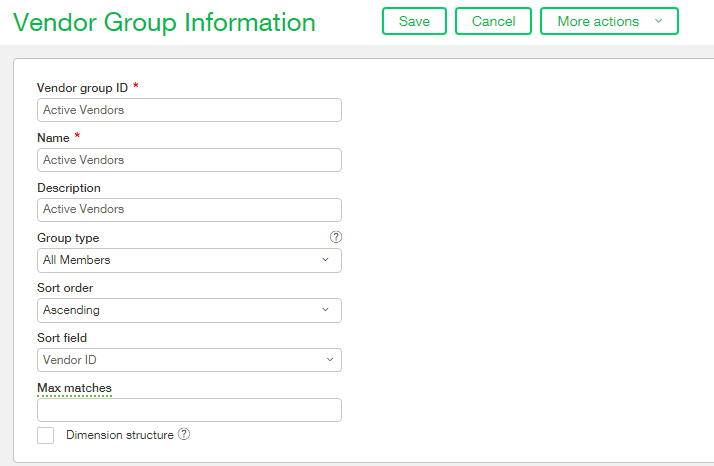
Although the only fields marked mandatory with a red star on the Vendor Group Information input screen are Vendor Group ID and Name you will also need to create a filter in the lower portion of the screen. Starting at the top of the screen you will see the Vendor group ID field which is the unique identifier for this Vendor group. In our case we are going to make a group to show Active Vendors and as such we will make our Vendor Group ID be ‘Active Vendors’ with the Name and the Description being the same. In some cases you might want to vary these names but for us this just works.

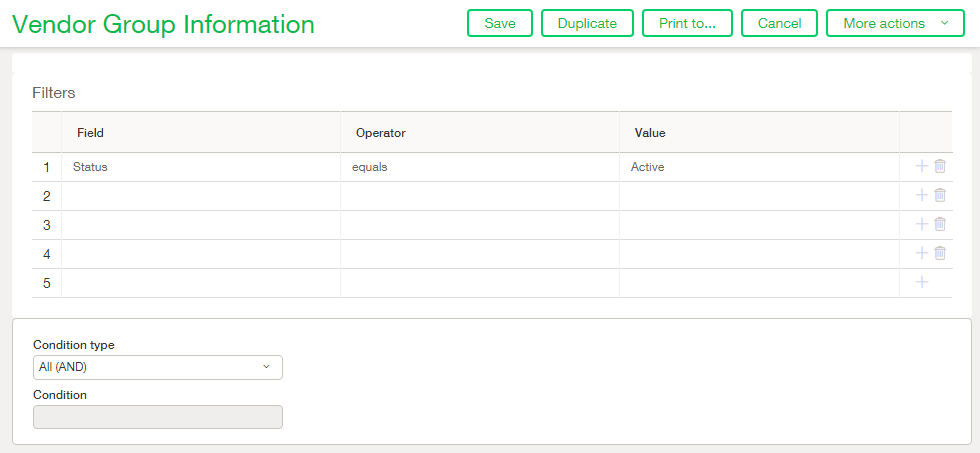
If you tried to save this group as-is you would be given an error message because you have yet to specify a filter on your group. At least one filter is necessary when making a group of type ‘All Members’ and at least one Member is necessary when making a group of type ‘Specific Members’. Scroll down to the bottom of the screen and key in your vendor group filter. In our case we are making a group to show all Active Vendors so we will set the group to filter on the Status field and only include those records which are marked as Active.

Your filter can be as simple or as complex as required based on your specific needs. In our case our filter is very simple but in other cases you may fill up the 5 filter lines provided and need to add more. More line items can be added using the + mark on the right of the filter lines.
Once you are satisfied with your filter, click ‘Save’ and you will be taken back to the Vendor Groups list screen. The members of your group can be viewed on the list screen by clicking the ‘Members’ hyperlink on the row you wish to view.

Join us next week for a lesson in more advanced filtering of Vendor Groups.