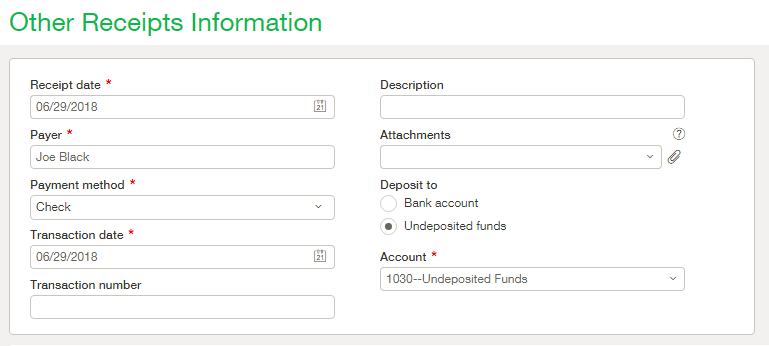
During normal day to day operations an occasion may arise where incoming funds need to be recorded that aren’t related to a customer or invoice. For example perhaps one of your employees accidentally used the corporate credit card to purchase personal gas and they must re-pay it. An Other Receipt could be used when he reimburses this money. In order to create a new Other Receipt simply navigate to Cash Management > All > Other receipts > Add.
Once you have the new Other Receipt open you will want to ensure that you complete the required fields. Those fields marked with a red star are the mandatory fields and in the header they include Receipt date, Payer, Payment Method, Transaction date, Account number (Bank account or Undeposited funds account) and deposit date (when depositing to a bank account).
The receipt date will default to today’s date but feel free to change that if applicable. Since this receipt is not linked to a specific customer you will notice that the Payer field is simply a text field. Please type in the name of the individual or business who you are receiving the funds from. You will notice the Payment method field is a dropdown field. The payment methods accept for an Other Receipt are check, charge card, record transfer and cash. The transaction date is a required field but does not auto complete when a new receipt is created so that field will need to be entered. In many cases you will want this date to match the Receipt date but in some cases it may differ. If we look at the example used earlier perhaps the employee purchased the gas on June 6 but the date of repayment is June 30. In that case the Transaction date would be June 6 but the Receipt date would be June 30.
The Transaction number and Description fields are optional but should be completed if the information is known. The attachment field is very useful in the event that there is some sort of digital documentation or supporting files that you wish to link up to this receipt.
If these funds are to be deposited into an Undeposited fund account be sure to select that from the radio button below ‘Deposit to’ and then select the Account ID from the dropdown. If, on the other hand, the funds will be deposited straight to a bank account, select the Bank account radio button followed by the Account number and the deposit date.

If you are operating in a multi-currency environment you will have an additional section on your input form called Currency. Be sure to select the appropriate currency from the transaction currency dropdown along with an Exchange rate date and Exchange rate type. If the Intacct Daily Rate does not match the rate required on this transaction you can select ‘Custom’ from the Exchange rate type dropdown and manually type in the rate you wish to use.

Join us next week as we complete the entries portion of the Other Receipts input form.