On occasion a vendor may require partial payment prior to completing services and as such there will not yet be an AP Bill in hand. For example, office movers may require a $500 deposit prior to booking the date of your office furniture move. Thankfully Sage Intacct includes the ability to create and apply Vendor Advances in Accounts Payable. After a vendor advance is created and posted it becomes a credit that will sit and wait until it is applied to a bill at some point in the future.
Advance payments to vendors are initiated through the + sign found at Accounts Payable > All > Payments > Advances. The visibility of this menu depends on your company setup. If you aren’t seeing the menu option but should please contact Black River Support directly so we can assist – [email protected].
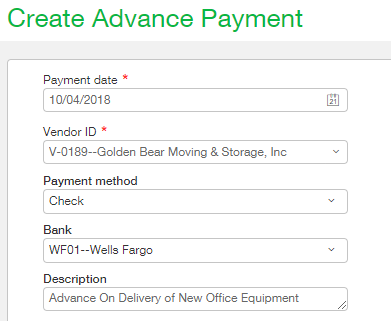
Clicking on the + beside Advances will take you to the Create Advance Payment input form. The required fields on the header of the Create Advance Payment input form are the Payment date, Vendor Id, Payment method. Depending on the Payment method selected more required fields may be displayed such as Bank or Charge Card number.

The lower portion of the input form is called the Detail section. This is where you assign the advance amount to one or more GL Accounts (Account labels) and possibly to one or more dimensions. Depending on your setup it may not be required to set up dimensions for the line item charge(s). Required or not it is recommended that these values be set as having them set leads to greater flexibility when it comes to reporting. The example below shows the $500 deposit on a single line item with the charge being assigned to the San Francisco Location’s Marketing Department.

If this charge should be distributed across more than one department you would simply create a second detail line item setting the department dropdown to the other department, as shown below.

Once you have completed the necessary information about the advance payment click the save button. What happens next depends on what payment method you selected for your advance. If you selected Check as your payment method a payment request will be created and the advance will be displayed on the Print Checks list screen. After the check is printed the advance is added to the Posted Payments screen. If the payment method selected is Credit Card then Sage-Intacct will create a credit card transaction and add the advance to the Posted Payments screen immediately. With the Record Transfer and the Cash payment methods the advance is simply added to the Posted Payment screen straight away.
If approvals are turned on the payment will need to be approved by a valid approver in AP > Payments > Approve Payments. In our case we have approvals on only for amounts over $5,000 and therefor our $500 advance by check will go straight through to the Print Checks screen. Once the check is printed and marked confirmed the advance will be visible in the Posted Payments screen as shown below.

Join us next week as we learn how to apply this advanced payment to an AP Bill.