In most business there are bills that roll in monthly for things such as electricity, cell phones, vehicle leases, copier leases, computer leases, etc. Using the AP recurring bill payments functionality will save heaps of time that would otherwise be spent manually keying these entries into Sage Intacct.
AP Recurring Bills are created, modified, inactivated and deleted in Accounts Payable > All > Bills > Recurring. In this example we will create a Recurring bill for a phone bill with an amount of $55.22. This bill is received on the 12th of the month every month.
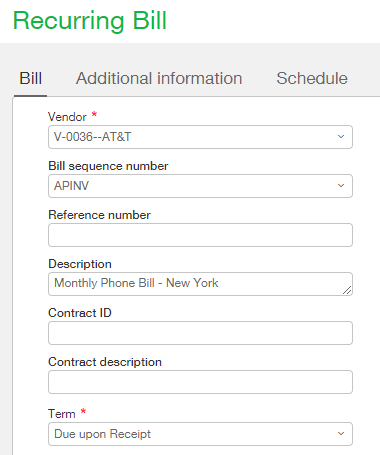
Navigate to Accounts Payable > All > Bills > Recurring and click the ‘Add’ button at the top right. You will be greeted with the Recurring bill input form where the required fields; Vendor, Term, GL Account and Amount, are marked with red stars. Starting at the top of the form complete the header fields necessary for your transaction.

Once this header information is completed it’s time to enter the detail information. The lower portion of the screen where you specify the line items for the bill is referred to as the detail or perhaps the line item detail section. The GL Account (Account label) and Amount are the only required fields in this section but for more powerful reporting it’s best to select as many dimensions as possible. Depending on your setup, one or more dimensions may be a required field. When a Recurring Bill is saved Sage Intacct insures that all required dimension are completed and will display a message if any are missing. In our example below we will create a recurring bill for Telecommunication in the amount of $55.22. In our example we are only billing this charge to one GL Account/Dimension combination and as such we will only complete one line.

If you were distributing the charge across multiple departments, you would enter 1 detail line item per department. The example below shows the charge evenly distributed across 2 departments:

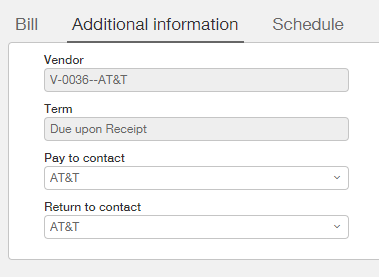
The Additional Information tab is mainly populated based on values selected on the Bill tab but a few of the fields can be modified as required. The Vendor and Terms are read only fields but the Pay to and Return to contact record drop downs can be changed if necessary.

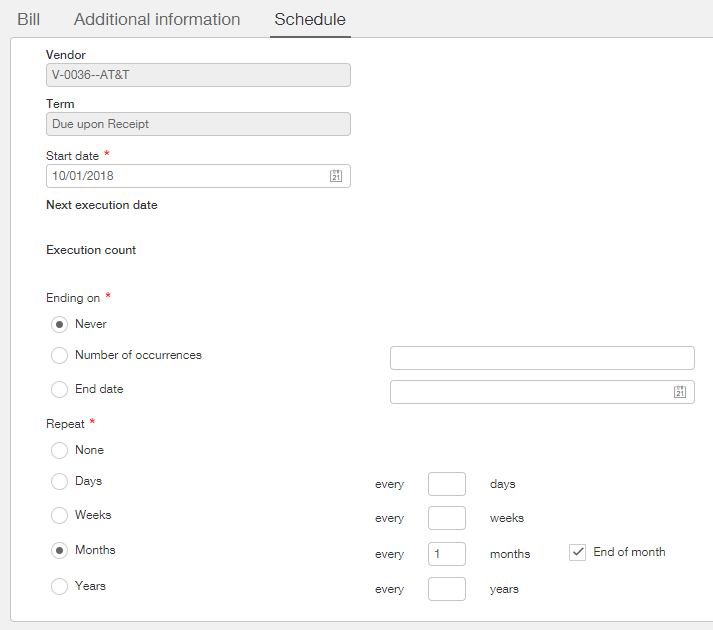
The Schedule tab is where you tell the system how often and on what day it should create a new bill. The Vendor name and Term fields on the Schedule tab will be automatically completed based on the information selected on the Bill tab and are read only. A required field on this tab is the Start date tab. Most often this will be today’s date but occasions may arise when you will want to select a different date. Recurring bills can be created retroactively. For example if today’s date is October 3rd but you wish to create this phone bill for October 1, you can set the Start date as October 1st. When the recurring bill is saved Sage Intacct will evaluate the schedule and automatically create any and all bills necessary between the start date and today’s date.
The lower portion of the screen is where you set the date you wish the repetition to end on and the repetition frequency. As our phone bill is ongoing with no known finish date we will set the Ending on value as Never. If/when we need to stop this bill from duplicating, perhaps we changed phone companies, we can end the Recurring bill at that time by modifying this screen and adding an end date or by setting the Recurring Bill Status to Inactive. The Recurring Bill Status is found on the Bill tab.

When you are satisfied with the values you have entered for your Recurring bill feel free to click save. If your start date is in the past Sage Intacct will evaluate whether any Bills should be created in the period between then and today, if so, those bills will be automatically created when you click save.